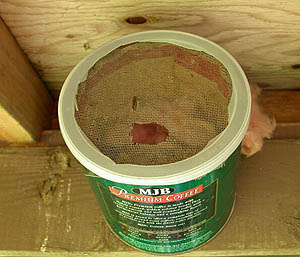
to show cotton inside
© Dave Pehling
© Dave Pehling
BUG OF THE MONTH SUPPLEMENT
Coffee Can Cottages
for Bumble Bees
(and other critters)
Order Hymenoptera, Family Apidae
Copyright © 2002 by Dave Pehling
This article originally appeared in Scarabogram, February 2002, New Series No. 262, pp. 2-3.
For the last couple of years I have been experimenting with making bumble bee houses out of large (3 lb. size) coffee cans. With some simple modifications, I think these can (no pun intended) make useful, if not esthetically pleasing, nesting "boxes" for several species of Bombus.
|
| Bee "hovel" from end, cardboard removed to show cotton inside © Dave Pehling |
|
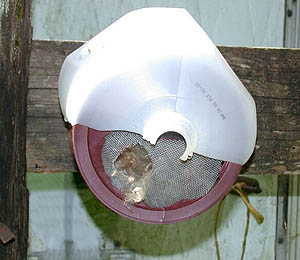
| Bee hovel in place with plastic jug rain roof © Dave Pehling |
I've noticed in past years that at least some species of bumbles will readily nest in stored fiberglass insulation, old mattresses, dried animal skins, used birdhouses, rotten logs and other unlikely settings. In "neatly kept" yards and gardens, these items are generally quite rare and the bumble bee population is limited by a lack of suitable nesting sites.
There are, of course, nice bumble bee houses that you can buy at many garden stores and nurseries for a mere $30-$40, but research has shown that, even in ideal settings, occupation of nest boxes is only 30% at best. Therefore, it occurred to me that a more effective way to have your very own bumble colony would be to saturate an area with inexpensive artificial nests. This is not really a new idea. Sladen, 1912; Frison, 1926; Fye & Medler, 1954; and Hobbs et al., 1960, 1962 all experimented with setting out domiciles for use by overwintered queens in the field.
The design I'm working with (see sketch below) is made from the large coffee cans, mentioned above, and is lined with corrugated cardboard, cut to fit snugly inside the can. The cardboard does not need to be glued as spring-tension of the material holds it in place.
Circular pieces are cut to fit the top and bottom of the can and a 3/4-inch hole is cut through the top piece for a door. A corresponding hole is cut in the plastic snap-on can lid. This will be the front of the nest when mounted. Several 1/8-inch holes are drilled in the back of the can and the side that will be the bottom of the nest for drainage and extra ventilation.
Next, the can is filled 1/3 to 1/2 full of a fibrous material. Upholsterer's cotton is often used but fiberglass insulation, wool, animal hair, old birds' nest or mouse nest material or similar material works well. Don't use surgical cotton, as the bees tend to become entangled in such a finely fibrous substance.
In 2001, I placed about 6 or 7 of these nest-cans around my house in Granite Falls. Nests should be placed by mid-February to entice early-awakening queens. Queen bumble bees were soon checking out four of the cans and they appeared to take up residence.
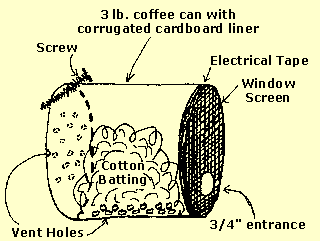 |
| Sketch of bee hovel showing construction details © Dave Pehling |
One of the cans that was being used (the queen was seen taking pollen into the nest on several occasions) was soon taken over by a winter wren. I don't know if the bird killed the bumble or if the bee met an unfortunate demise while foraging. At any rate, the wren successfully raised her own brood in the coffee can, not exactly what I had in mind. Perhaps it was because I used an old winter wren nest as nesting material in that particular can that the bird appropriated it? To avoid this sort of problem, one can make the entrance hole no larger than 3/4 inch rather than the one-inch opening that I used this year.
Two of the other nest cans were closely inspected by queens for several days in a row and I thought that they had taken up residence but, eventually, activity ceased and I could find no signs of brood-rearing when I checked out the nest material later in the summer.
One of the nest-cans that was mounted on an exposed stump was colonized by a small species of bumble. I think it was Bombus mixtus, though bumble bee ID is not my strong suit. They were quite busy through most of the summer and eventually built a nest about the size of a tennis ball. Problems with the can design became apparent when the bedding became damp during a summer shower and maggots (sarcophagids?) eventually began to grow in the old sheep's wool I used for nesting material. To avoid this problem, it is important to mount the nest-cans only in areas protected from rain. A cleaner bedding material would have helped, too. In 2002 I am going to devise plastic roofs made from plastic milk jugs (see photo above) for nest cans in exposed situations.
Another moisture problem is caused by the bees' respiration. Moisture readily condenses on the metal cans, so increased ventilation is needed for a healthy nest. I'll be trying a couple of different ideas in the coming season. [One of those ideas, screening replacing part of the plastic lid, is shown above.]
[See the May 1993 Bug of the Month, a common western bumbebee that might use your nests!]
References
Frison, T.H. 1926. Experiments in attracting queen bumblebees to artificial domiciles. Journal of Economic Entomology, 19: 149-155.
Fye, R.E., and J.T. Medler. 1954. Field domiciles for bumble bees. Journal of Economic Entomology, 47(4): 672676.
Hobbs, G.A., Virostek, J.F., and W.O. Nummi. 1960. Establishment of Bombus spp. (Hymenoptera: Apidae) in artificial domiciles in southern Alberta. Canadian Entomologist, 92: 868-872.
Hobbs, G.A., Nummi, W.O., and J.F. Virostek. 1962. Managing colonies of bumble bees (Hymenoptera: Apidae) for pollination purposes. Canadian Entomologist, 94: 1121-1132.
Sladen, F.W.L. 1912. The humble-bee, its life-history and how to domesticate it. Macmillan & Co., London, 283 pp.
Web sites:
•
The
Bumble Bees of Evergreen State College
•
The Bumble Bee Pages
•
Construction and Placement
of Bumble Bee Nest Boxes
•
Rearing Bumble Bee Colonies
in Captivity
This page last updated 26 July, 2005